Incubators: maintenance#
To avoid contamination issues, regular maintenance/cleaning is required. No disinfectant can help if the incubator is not clean, as dirt “protects” the bugs. Disinfection should always be carried out on clean surfaces. Therefore, the first step of a disinfection/decontamination is always cleaning and only afterwards disinfection.
List of equipment#
Panasonic / Sanyo (CO2 incubators)#
- MCO-19AIC
- MCO-19AICUV
- MCO-19AICUVH series
Panasonic (CO2 incubators)#
- MCO-170AIC
- MCO-170AICUV
- MCO-170AICIVH series
Sanyo / Panasonic (Multi Gas incubators)#
- MCO-19M
- MCO-19M(UV)
- MCO-19M(UVH)
PHCBI (O2/CO2 incubators)#
- MCO-170M-PE
Binder incubators#
- KB115
- KF115
- BF115
- BD53
- FD23
- C150
Personal Protective Equipment#

Before using the incubators#
- Always ensure that no error message is displayed on the screen
- If there is an issue with the instrument, send a ticket to the Instrument Care team through the ticketing system.
Routine maintenance#
Maintenance sheets
In BT1 and BT2, there are Incubator Maintenance Record Sheets on each incubator (except Binder incubators).
You can download them here.
Please fill these sheets after the montly cleaning, an exchange of the water or an H2O2 decontamination.
The lab support team is responsible for collecting the sheets, so please leave the old ones inside when adding a new one.
1. Decontamination of Binder incubators#
Once a month, the inner chamber and the trays of the Binder incubators should be cleaned using 70% ethanol.
- Open the outer and inner doors and remove all the trays
- Clean the trays using a mild detergent
- Wipe the inner chamber and the trays using 70% ethanol
- Replace the trays inside the chamber and make sure to ventilate before starting the incubator to avoid any residual alcohol
- Fill the “Incubator cleaning and decontamination record sheet”
2. Decontamination of Sanyo and Panasonic incubators#
The inner chamber of the incubators as well as all attachments should be cleaned once a month using a neutral detergent (no solutions containing acids, alkali or chlorine) or antiseptic solution such as 70% ethanol.
In priority, you should ask the technicians of your group to disable the alarm on Rmoni (monitoring system) or to do it by yourself if you received the training. If no trained person from your team is available, you can contact the instrument care team at least 24h in advance by email to instrument-care@uni.lu. In CC, add lcsb.dutycall@uni.lu and the instrument responsible.
If possible, start in the morning. This way, the alarm can be put back on the monitoring before 5 pm (time when the duty call starts)
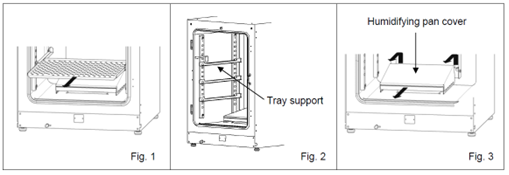
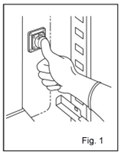
Open the outer and inner doors and pull out all the trays (Fig. 1).
When cleaning the incubator, the probes can stay inside, just make sure not to damage them by hitting them or spraying them with ethanol
Remove the tray supports (lift the front of the support, and pull it out) (Fig. 2).
Remove the humidifying pan cover by lifting it out of the pins on the rear side (Fig. 3).
- In MCO-170AIC incubators, the humidifying pan cover can be removed by pulling it out
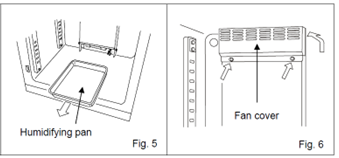
Pull out the humidifying pan (Fig. 4).
Loosen the two screws securing the fan cover and take off the fan cover (Fig. 5).
- In MCO-170AIC incubators, the fan cover can be removed by pulling it out
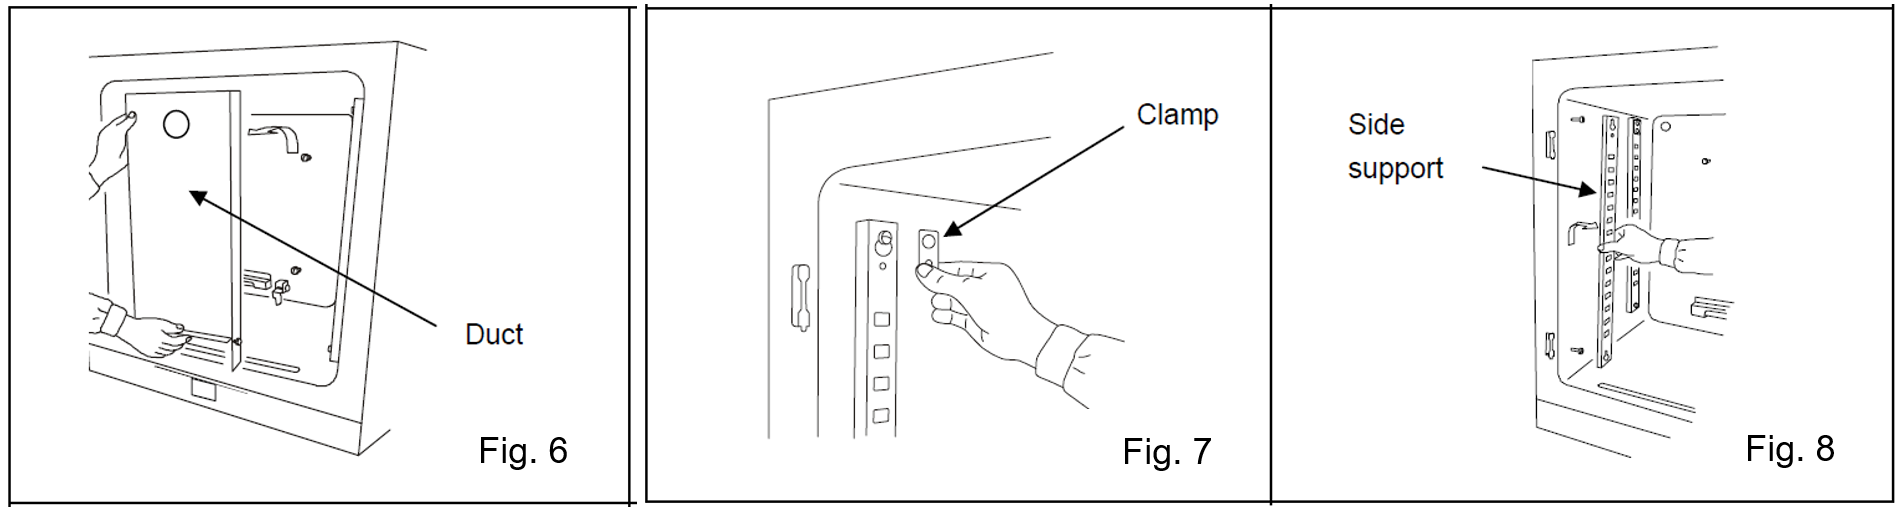
Lift the duct and remove it from the pins on the rear side (Fig. 6).
Remove the screw securing the clamp of the side support, then remove the clamp (Fig. 7).
Remove the side supports (Fig. 8).
Clean all the attachments with a diluted neutral detergent, then rinse them thoroughly with water.
Wipe all the attachments and the inner chamber with 70% ethanol. Be careful not to leave any residual alcohol. DO NOT spray ethanol inside the chamber: spray the ethanol on a wipe. Spraying ethanol may damage sensors.
Wipe the water level sensor with 70% ethanol. Be careful not to leave any residual alcohol. When cleaning the sensor, take care not to apply excessive force to the lead wires.
To reinstall all the attachment, perform the procedure in reverse order from step 9 to 1.
Refill the humidifying pan following procedure “4.2.4 P3: Filling the humidifying pan”.
Notify the person who disabled the sensor or the Instrument Care team for the reconnection of the temperature and CO2 monitoring. Include the Duty call and the instrument responsible in CC.
Switch the incubator back on, and wait until the temperature and CO2 levels are back to the set values before transferring the cells back
Fill the “Incubator cleaning and decontamination record sheet”.
⚠️Make sure to use osmotic water and not ultrapure/milliq water; ultrapure water will create corrosion. Unsure which water to use? Contact the Support Team or have a look on the dedicated How-to card.
3. Filling the humidifying pan#
Every two weeks, or upon low water level shown by “RH pan” on the display, the water needs to be exchanged.
- Lift the humidifying pan cover, pull the humidifying pan out of the incubator and empty the remaining water.
- Clean the pan with a neutral detergent, then rinse it thoroughly with osmotic water.
- Wipe the pan with 70% ethanol.
- Wipe the water level sensor with 70% ethanol. Be careful not to leave any residual alcohol. When cleaning the sensor, take care not to apply excessive force to the lead wires.
Note: the PHCBI MCO-170M-PE incubators do not have a water level sensor. - Wipe the bottom of the incubator chamber and the water level sensor with 70% ethanol.
- Return the pan to the chamber with the shorter side to the back. Improper installation may cause condensation.
- Add approximately 1.5 L of autoclaved osmotic water preheated to 37°C in a water bath to the pan.
- Push the humidifying pan back in the chamber until the water level sensor gets back in vertical position, then close the humidifying pan cover.
- Fill the “Incubator cleaning and decontamination record sheet”.
Notes
- Use autoclaved osmotic water and not ultrapure MilliQ water (causes rust).
- Adding low temperature water to the humidifying pan will significantly lower the temperature in the chamber.
- If during the refill of water, some water spills out of the pan, make sure to wipe it off.
4. H2O2 decontamination of Sanyo and Panasonic incubators#
Additional precautions when using H2O2
- Wear protective equipment: lab coat, safety glasses and gloves
- Do not use fire in the area where the reagent is being handled
- Do not leave any reagent in the container
- Do not place flammable or combustible material near the area where the reagent is handled
If the chamber has been contaminated, or when cleaning the chamber prior to starting a culture, H2O2 decontamination can be performed using a H2O2 generator (MCO-HP). The decontamination cycle takes about 3 hours. After the decontamination itself, time should also be planned for aeration of the chamber before placing the cells back. The different phases of the decontamination cycle are:
- Heating to 45°C
- Vaporization of H2O2 (7 minutes), the continuous operation of the fan ensures a complete distribution of H2O2 across the whole incubator
- UV resolution (90 minutes, to break down the H2O2 to water and oxygen)
- In priority, you should ask the technicians of your group to disable the alarm on Rmoni (monitoring system) or to do it by yourself if you received the training. If no trained person from your team is available, you can contact the instrument care team at least 24h in advance by email to instrument-care@uni.lu. In CC, add lcsb.dutycall@uni.lu and the instrument responsible.
- If possible, start in the morning. This way, the alarm can be put back on the monitoring before 5 pm (time when the duty call starts).
- For BT1 and BT2, book the H2O2 generator (MCO-HP) in Quarks.
- Consult the related How-to Card to know how to book an equipment in Quarks.
- Select any of these, depending on your building and the available equipment:
- MCO-H2O2 Generator-LCSB1076 [BT2_103] – ref: LCSB1076
- MCO-H2O2 Generator-LCSB1077 [BT2_103] – ref: LCSB1077
- MCO-H2O2 Generator-LCSB1078 [BT2_103] – ref: LCSB1078
- MCO-H2O2 Generator-LCSB1079 [BT1_204] – ref: LCSB1079
- In BTA, the device is in room 150 and does not need to be booked.
- Pick up the generator (MCO-HP), a rubber plug and a “Decontamination in progress” sign and a bottle of H2O2 (MCO-H2O2, stored in a story foam box the delivery fridges of BT1 and BT2, in the fridge in room 840 for BTA,). Do not use H2O2 from another manufacturer.

- Place the “Decontamination in progress” sign on the door of the incubator to be decontaminated.
- All CO2 and multi gas incubators are on monitoring, therefore, the probe should be removed before the decontamination.
Be extremely careful with the probes: they are fragile and expensive!
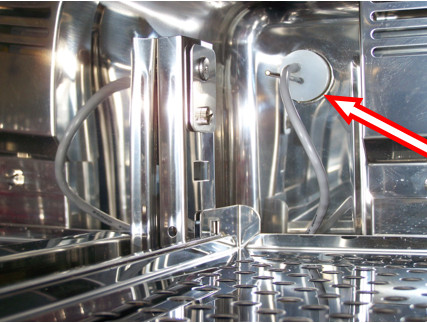
- Unscrew the cable connected to the probe, located outside the incubator, usually on the side (at the arrows on the following picture).
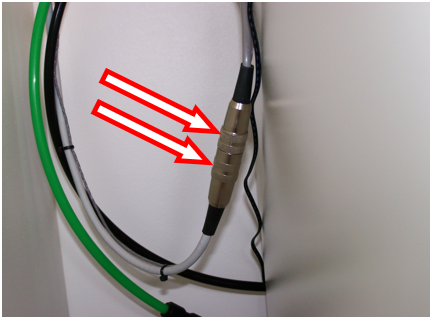
- Inside the incubator, remove the upper tray to free the cable of the probe which is located in the middle of the incubator.
- Remove the probe from the incubator by pulling gently the rubber plug (see arrow on the picture below). Pull the entire cable out and store it above the incubator. Replace it with the rubber plug picked up with the generator.
- Remove
The remaining trays, the tray supports, the clamps and the side supports,
The humidifying pan cover and the humidifying pan,
The fan cover and the duct (you will need a Philips screwdriver to loosen the screws).
- Clean all attachments with a mild detergent.
- Wipe all attachments and the chamber with 70% ethanol.
- As alternative to point 6, you can autoclave the parts at 121°C for 20 minutes. Pack the parts in an autoclave bag.
- Place back the side supports and the clamps.
- Place the tray supports in the 2nd, 5th, 7th and 9th holes from the top of the side supports, then set the trays (if the incubator contains only three trays, set the tray supports on the 2nd, 5th and 7th holes from the top).
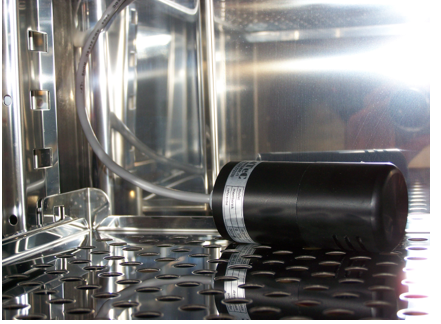
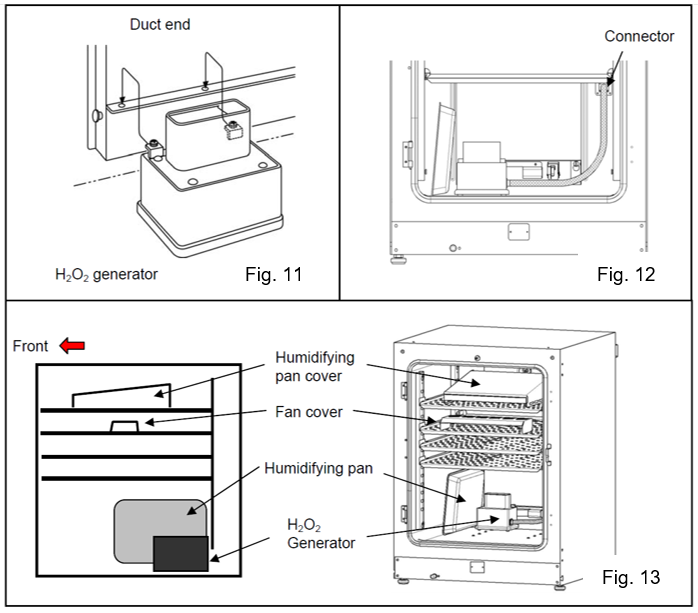
- Pour one bottle of H2O2 reagent into the H2O2 generator. Set the two pins on the H2O2 generator in the two holes on the lower left side of the duct (Fig. 11).
- Connect the H2O2 generator and connector to the bottom right of the far side of the chamber with the enclosed cable. Be sure to keep the connector cap (Fig. 12).
- Set the humidifying pan cover, the humidifying pan and the fan cover as shown in Fig. 13 and close the inner and outer doors.
- In MCO-170AIC, the fan cover should be placed back to its original spot for H2O2 decontamination.
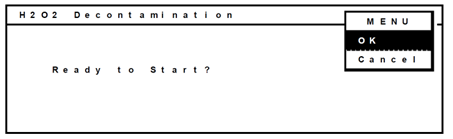
- Press the “H2O2” key for 3 seconds. The system check will start.
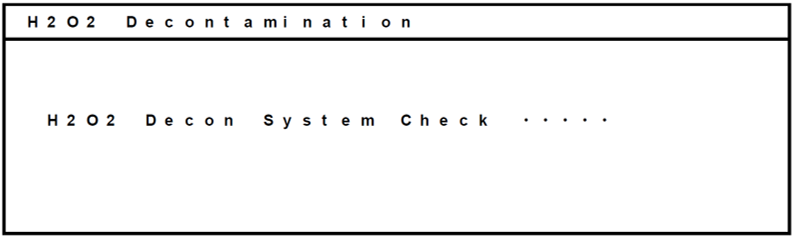
- If the system is ready to start, the following display appears. Select “OK” and press the “ENTER” key to start the H2O2 decontamination.
Notes:
Decontamination will be performed automatically until step 15.
The buzzer rings when the decontamination is complete.
The outer door is locked by the electric lock for safety until the decontamination is complete. DO NOT try to open the door!
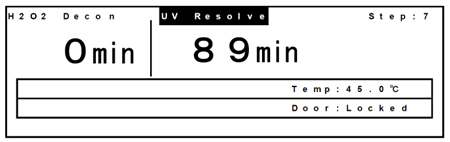
- During the H2O2 mist generation, “H2O2 Decon” will blink at the top left corner of the screen.

- After completion of the H2O2 mist generation, “UV resolve” blinks at the top of the screen and the H2O2 gas resolution by UV starts.
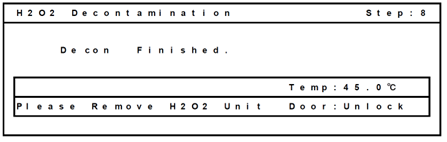
- After H2O2 gas resolution, H2O2 decontamination has been completed. The following display appears. Open the outer and inner doors, then disconnect the cable of the H2O2 generator from the connector in the chamber. Take out the H2O2 generator.
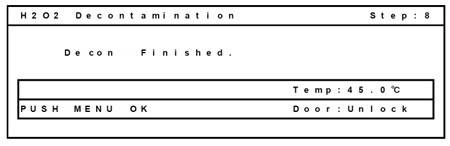
- The following display appears. Press the MENU key to display the menu. Select “OK”, then press the ENTER key to return to the top display.
Dilute the remaining H2O2 reagent in the H2O2 generator with a large volume of water and dispose of it in the sink. Rinse and wash the H2O2 generator with osmotic water.
Place the connector cap back in the chamber. If the cap is missing, contact the Support Team.
After H2O2 decontamination, surplus of liquid H2O2 remains at the bottom of the chamber. This solution contains low density of H2O2 (about 1% or less) and can be wiped with a non-woven clot.
Ventilate the incubator sufficiently and place all attachments back into the chamber.
To reconnect the CO2 and temperature probes, follow steps 5 c to a.
Notify the person who disabled the sensor or the Instrument Care team for the reconnection of the temperature and CO2 monitoring. Include the Duty call and the instrument responsible in CC
Bring the H2O2 generator, the rubber plug back and the “Decontamination in progress” sign to room 204 in BT1 or 103 in BT2.
Fill the “Incubator cleaning and decontamination record sheet”.
Switch off a device#
If an incubator is not used, contact the instrument-care@uni.lu. In CC, add the lcsb.dutycall@uni.lu and the instrument responsible. Ask for the instrument to be switched off.
Empty the water pan.
Clean the incubator with 70% ethanol. See Decontamination of Sanyo and Panasonic incubators.
Settings modification#
If you need to change the temperature, CO2 or O2 settings, contact instrument-care@uni.lu. In CC, add lcsb.dutycall@uni.lu and the instrument responsible.
Ask for the settings change.