-80°C freezers: maintenance#
Routine maintenance of fridges and freezers prevents from issues and preserves integrity of samples.
In the event of a fridge or a freezer would get damaged or have a failure due to a lake of maintenance on the user side, the cost of the repair or of the replacement will be charged to the group in charge of the device.
The fridges and freezers are under constant temperature monitoring. In order to avoid alarms, the monitoring has to be disconnected before the cleaning of 4°C fridges and the defrosting of -20°C/-80°C freezers (see How to deactivate the alarm in Sensor4Lab).
Please inform the Instrument Care team before every kind of maintenance by sending a ticket 24h before starting your maintenance.
Always start your maintenance in the morning.
When the maintenance is finished and the temperature is back to normal, reply on the open ticket to let them know you are done.
How to deactivate the alarm in Sensor4Lab#
All the freezers are monitored via a software called Sensor4Lab. To avoid any alarm due to the defrosting, the first step of the defrosting process is always to put the monitoring on hold. This step is needed for the cleaning of 4°C fridges and defrosting of -20°C/-80°C freezers.
Only technicians have access to Sensor4lab. Please ask a technician of your team to disable the sensor associated to the fridge you want to clean or defrost.
- If you’re a technician, go on Sensor4lab and login with your credentials received from the Instrument Care Team. If you don’t have any credentials yet, please send a ticket
- Please follow the process explained here
Please note that there is a 30 minutes delay between the moment that you disable the sensor and the response of the system. This means that you should disable the monitoring 30 min before you start the maintenance.
How to defrost a -80C freezer#
This section describes the maintenance steps of the Ultra-Low Temperature Freezers from Sanyo (MDF-U76V-PE, MDF-U76V-P and MDF-U74V).
Inner doors defrosting - once a month#
With repeated opening and closing, frost builds on the inner doors of the chamber. Excessive frost can cause some gaps between the cabinet and the magnetic gasket, resulting in poor cooling.
- Open the outer and inner doors and remove the inner doors by lifting them up
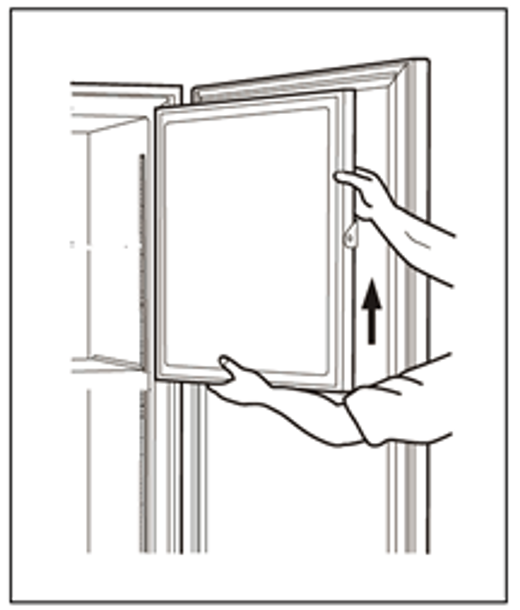
- Place the inner doors in a dedicated plastic box to let the ice melt
- Dry the doors well before placing them back in the freezer
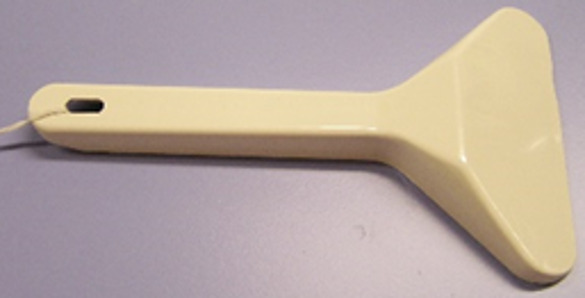
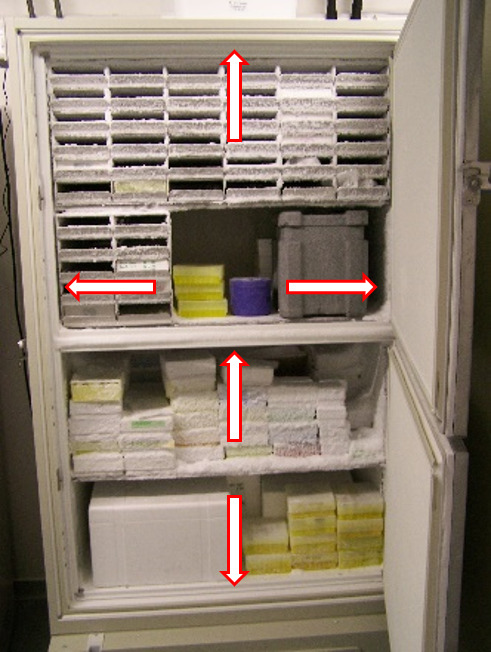
- Use a scraper to defrost the inner parts of the chamber
- Scrape the inside where the doors are in contact with the chamber (see arrows on the picture)
If the rubber bands around the inner doors are damaged, contact the Instrument care team for replacement by sending a ticket
Fill the maintenance form located on the door of the freezer
Air intake port cleaning - once a month#
When the freezer door is closed, the warm air that entered the chamber cools down rapidly, and contracts causing a negative pressure. This is the reason why it is difficult to open the freezer shortly after it was closed.
Some -80°C freezers are equipped with an air intake port, which allows to counteract the negative pressure in the chamber. It is found on the left side of the freezer, by the door handle. Turn the cap counter clockwise about two laps. Then, let the air enter the chamber for about 20 seconds and open the door. Finally, do not forget to close the cap.
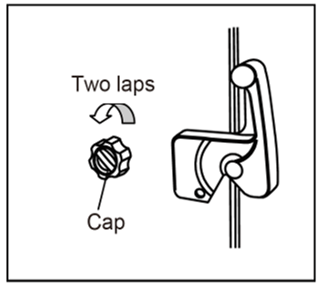
- Take the cap completely out by turning it counter clockwise
- Using the stick for air intake port cleaning, break the ice inside the port (do not use sharp tools such as knife or screw driver)
- Make sure to remove all the ice from the cap groove
- Place the cap back on the air intake port
- Fill the maintenance form located on the door of the freezer
Condenser filter cleaning - once a month#
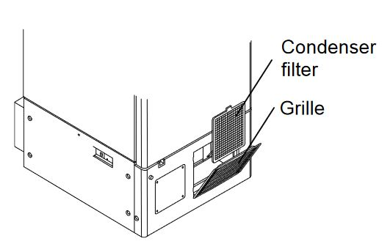
- Open the grille by pulling it to you
- Take out the condenser filter and wash it with water
- Don’t touch the condenser directly! This may cause injury by hot surface
- Replace the condenser filter and the grille
- Check that the filter check lamp is off
- Fill the maintenance form located on the door of the freezer
Inner chamber defrosting - once a year#
- 24h before your maintenance, inform the Instrument Care team by sending a ticket and disable the Rmoni sensor
- Switch off the freezer (the switch is located at the bottom of the left side of the freezer)
- Transfer all the boxes to the backup freezer
- Remove all racks and let them defrost in a dedicated box
- Remove the inner doors, and let the outer doors open
- Remove as much ice as you can to speed up the process
- Once all the ice melted, dry the freezer with a cloth
- Place back the doors and racks
- Switch the freezer back on and wait until the pre-set temperature is reached
- Transfer the samples back
- Enable the Rmoni sensor and inform the Instrument Care team that you are finished and that everything is back to normal
- Fill the maintenance form located on the door of the freezer